Unexpected Automation: Creating an automated form filler with Chrome Extensions
Learn how to create chrome extensions to fill in forms for you...


It's been a while since I've done an unexpected automation themed post due to my work on my API Testing tutorial at CASTx2017. So I thought given I recently created my own Chrome extensions, why not demonstrate how easy it is to create your own Chrome extension. So for this post, I want to share my experience of how you can quickly create an automated form filler in the form of a chrome extension that can fill in test data for you. This is based upon a new project I started recently and how one of the first things I looked to automate was quickly populating a large form that I regularly testing in an exploratory testing context.
The problem
Let's say part of your application has a large form that contains multiple fields that are all mandatory. You may find yourself using up a lot of time filling in every field whilst testing specifics fields or to create new data. This can be time-consuming, frustrating and prone to human error so how do we make this easier? By leveraging Chrome extensions we can create a simple tool that is easy to use to quickly fill in fields at the click of a button and still allow you to edit form content as you please.
Setting up your automated form filler
For this blog, we will be working with this Google form, although If you want to try this out on a different form the example will apply.
To get started I have prepared a basic project for you that you can download from here:
download from here. The project contains two files to get your extension up and running, the manifest file and index.html file. Let's take a quick look at them:
- manifest.json - The manifest file is a required part of a Chrome Extension. The file provides the browser with the extension's name, description, version number and so on. It's also responsible for declaring to Chrome what the extension is going to do, and what permissions it requires in order to do those things.
- index.html - You will notice in the manifest file that it has a
default_popupsetting that refers to the index.html. This means when you click on the extension in the browser it will load the HTML and create a mini web page, complete with its own DOM.
To load the extension into the browser navigate to the extensions manager page, click on Load unpacked extension... and select the src folder. You will see a new icon appear in your browser and clicking on it will load a page like so:
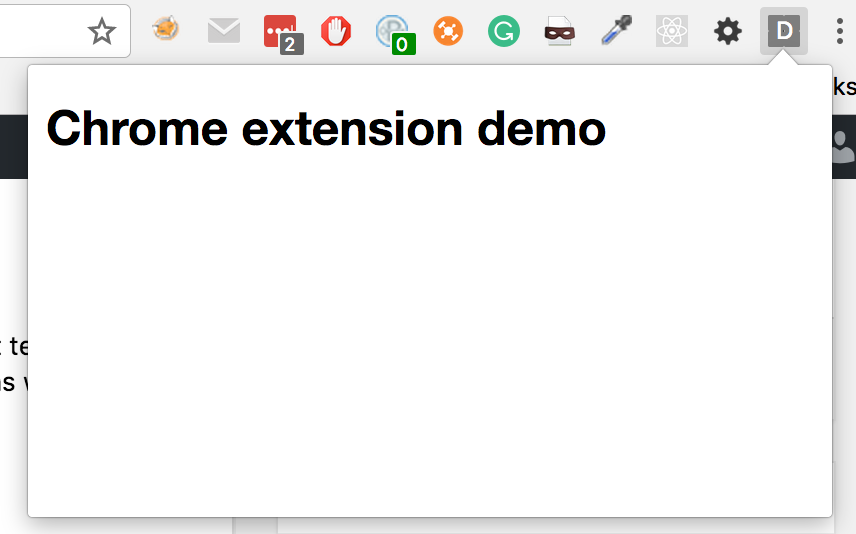
Trigger JavaScript in browser
The magic behind Chrome extensions is that it each extension has it's own DOM that is separate to the page you have in view and other extensions. However, what we want our extension to do is trigger JavaScript in our main window so we need to use some specific extension methods to inject JavaScript into our browser window. Let's start by having our extension simply trigger an alert that will return the title of the page.
Update index.html
Add the following to the body of your index.html file
<button id='fillForm'>Fill form</button>
  script src='action.js'></script>
(Note: I had to remove the initial bracket for the script line to stop browsers reading it as valid HTML, so don't forget to add it back in)
This gives us a button to create and a reference to the JavaScript file that will contain our code to trigger an injection into the main browser page.
Create action.js
Now create a new JavaScript file name action.js and in the following code:
document.getElementById('fillForm').addEventListener('click', function(){
  chrome.tabs.executeScript({
    code: "alert(document.title)"
  });
});
Let's look in more in detail what some of these methods do:
addEventListener- Chrome extensions don't allow event handlers meaning using an HTML attribute such asonclickwill return a security error. Instead, we create a listener that allows the extension to wait and listen for a button click and then trigger some code.chrome.tabs.executeScript- The executeScript method is what injects our code into our main browser page. Notice that it takes an object with an item called code and that the code is provided as a string. This is the code that is injected into the page and runs.
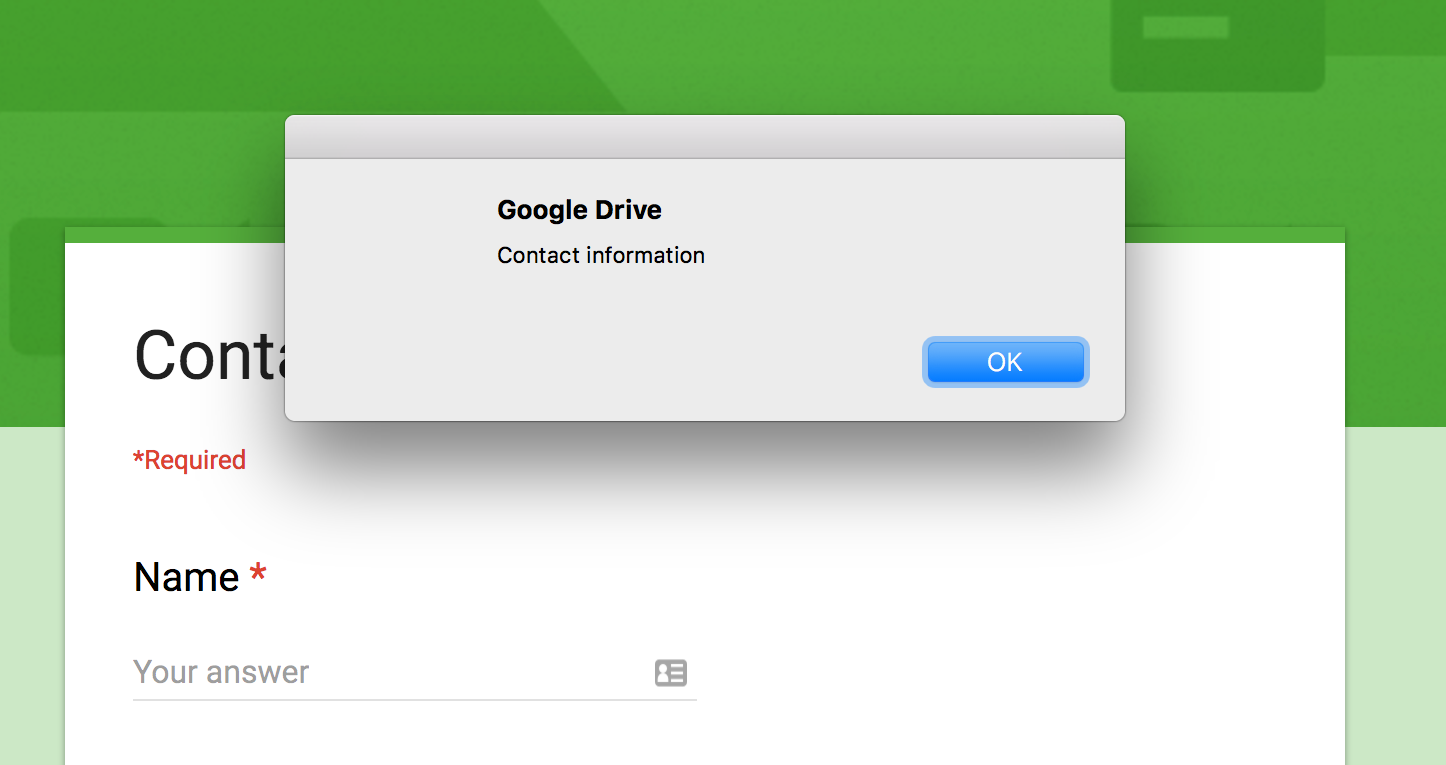
Head to your extensions manager page and refresh the extension to load in the latest code and head over to the Google form and open your extension and click on the button. You should see a popup similar to this:
Inject data into fields
Now that we have a way to inject JavaScript into the page, we can expand on it and fill in the form. Now we don't really want to create all our injection code as a long string so let's update executeScript and change it to:
document.getElementById('fillForm').addEventListener('click', function(){
  chrome.tabs.executeScript({
    file: "injector.js"
  });
});
Notice how executeScript is now referencing a file rather than a string. We need to create the referenced file injector.js and then add the following:
var placeholder = document.querySelectorAll('.exportLabel');
placeholder[1].remove();

document.querySelector('input[aria-label="Name"]').value = 'Mark Winteringham';
So we first remove the placeholder element over the form just to make it look a bit more readable when injecting the content (this is optional) followed by finding the form field and setting the value. Once again, refresh the extension and try it out. Hey presto, you should see the first name populated with
So to finish up we can update injector.js to fill in the form completely with:
var placeholder = document.querySelectorAll('.exportLabel');

placeholder[1].remove();
document.querySelector('input[aria-label="Name"]').value = 'Mark Winteringham';

placeholder[2].remove();
document.querySelector('input[aria-label="Email"]').value = 'test@email.com';

placeholder[3].remove();
document.querySelector('textarea[aria-label="Address"]').value = 'Lorem ipsum';

placeholder[4].remove();
document.querySelector('input[aria-label="Phone number"]').value = '07482394123';

placeholder[5].remove();
document.querySelector('textarea[aria-label="Comments"]').value = 'Lorem ipsum';
Wrapping up
You may notice that when you load up your browser at a later date that you will get a 'Disable Developer Mode Extensions' popup which is a bit irritating. Whilst you can cancel the popup you might want a better solution for dealing with the popup. I have found turning the extension off via the extensions manager page when I'm not using it works fine and stops the popup. However, if you find yourself in a situation where multiple members of your team are using your extension you can actually add your extension to Google web store and restrict who can download it to specific members of your team.
And there you have it a tool that can now easily populate data for you on the fly and help with your exploratory testing or debugging.